The Menu mode is used for starting and stopping the logger, and for changing various settings on the instrument.
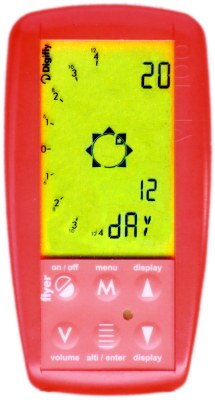
In the screen shot above, we are on item 12 of the SET menu. This is the 'DAY' item, for setting the day of the month, and it is currently set to 20 (20th of the month).
For example, to set the hour of the day:
To enter the Menu mode, click the Menu button ![]() . This takes you to the Menu top level.
. This takes you to the Menu top level.
In the menu top level, use the Up button ![]() and Down button
and Down button ![]() to scroll through the Menu top level items. The six top level menu items are REC, ALTI, PEAK, LINK, SET and UNIT.
to scroll through the Menu top level items. The six top level menu items are REC, ALTI, PEAK, LINK, SET and UNIT.
When you find the top level item that you want, click on the Enter button ![]() to go into the sub-menu for that item.
to go into the sub-menu for that item.
Within the sub menu, use the Up button ![]() and Down button
and Down button ![]() to scroll through the sub menu items. The abbreviated name for that parameter appears on the bottom line of the display, and its current value is shown on the top line of the display. For the SET menu items only, the display line above the abbreviated name is used to show that parameter's ordinal position within the sub-menu sequence, from number 1 to number 17 (1 to 15 on software pre version 7). This information is not shown in other sub-menus, for reasons that only Digifly know.
to scroll through the sub menu items. The abbreviated name for that parameter appears on the bottom line of the display, and its current value is shown on the top line of the display. For the SET menu items only, the display line above the abbreviated name is used to show that parameter's ordinal position within the sub-menu sequence, from number 1 to number 17 (1 to 15 on software pre version 7). This information is not shown in other sub-menus, for reasons that only Digifly know.
Then when you find the sub-menu item that you want, click on the Enter button ![]() to go into edit mode for that item. The current value flashes while in edit mode.
to go into edit mode for that item. The current value flashes while in edit mode.
When in edit mode for a parameter, use the Up button ![]() and Down button
and Down button ![]() to choose the value that you want, and then click on the Enter button
to choose the value that you want, and then click on the Enter button ![]() to set that value, or click on the Menu button
to set that value, or click on the Menu button ![]() to back out without setting it.
to back out without setting it.
In the Menu mode, use the Menu button ![]() to go up one level at any time, i.e. to cancel out of edit mode, to go up from sub-menu to top-level menu, and to go up from top-level menu out of Menu mode and back to normal mode (i.e. Enter always means go in a level, and Menu usually means go out a level, except for when you're outside of the Menu mode, when it invokes the Menu mode).
to go up one level at any time, i.e. to cancel out of edit mode, to go up from sub-menu to top-level menu, and to go up from top-level menu out of Menu mode and back to normal mode (i.e. Enter always means go in a level, and Menu usually means go out a level, except for when you're outside of the Menu mode, when it invokes the Menu mode).
Menu functions for Flyer with v7.1 software
| Menu | # | Sub-Menu | Function |
| REC | 1 | No sub menu items | No sub menu items. Just click on Enter button to start or stop the logger |
| ALTI
See note 1 See note 2 |
1 | ALT1 | Set reference pressure on A1 so that it indicates this height for where you are now |
| 2 | ALT2 | Set reference pressure on A2 so that it indicates this height for where you are now | |
| 3 | ALT3 | Set reference pressure on A3 so that it indicates this height for where you are now | |
| 4 | PRS1 | Set reference pressure directly on A1 | |
| 5 | PRS2 | Set reference pressure directly on A2 | |
| 6 | PRS3 | Set reference pressure directly on A3 | |
| PEAK | 1 | View logger (peak values logged for your flights) | See logger page |
| LINK | 1 | DIGI | Stuff to do with connection to a PC. I've not used it, but from what I can see, selecting this menu item enables the serial port for connection to a computer. |
| SET | 1 | V-UP | Set threshold for 'up' bleeper. Units are tenths-of-ups, so 10 means beep at 1-up or more. I have this set at 2 (setting it at 1 seems to make it chatter when at rest). |
| 2 | V-DN | Set threshold for 'down' bleeper. Units are tenths-of-downs, so 40 means beep at 4-down or more. I have this set at 20 (2-down), so 'normal' sink (moving through still air) doesn't set it off. | |
| 3 | SOUN | Choose pitch of vario sound: 0 = normal, 1 = cricket chirp, 2 = bat fart | |
| 4 | SVAR | Adjust the vario sensitivity. Range 1-10. Default 1 (most sensitive). Units unknown. Best left at the default. | |
| 5 | INTE | The digital readout of up and down is averaged over this number of seconds (0-60). Default is 0 (instantaneous, no averaging), which is probably not smart. I use 5. Dean uses 20, but then he can reasonably hope to core in a thermal for that long. | |
| 6 | STAL | Threshold for your stall alarm (requires speed probe). Zero means no alarm. | |
| 7 | TEC | Total Energy Compensation (only makes sense for hangies, and then only with a speed probe). | |
| 8 | KIAS | Correction factor (in percent) for air speed reading for optional speed probe. Wind tunnel required for accurate setting. | |
| 9 | KBAR | Calibrate the instrument's pressure-sensing element in 0.1mB steps, plus or minus. Mercury column required for accurate setting. See note 3 | |
| 10 | HOUR | Set the hour for the clock (0-23) | |
| 11 | MIN | Set the minutes for the clock (0-59) | |
| 12 | DAY | Set the day of the month for the clock (1-31) | |
| 13 | MONT | Set the month of the year for the clock (1-12) | |
| 14 | YEAR | Set the year for the clock (0-99) | |
| 15 | AUTR | Flight logger start options (v7 software and later).
0 = Manual start – start when you click on the Enter button in the REC menu 1 = Always start – start as soon as you turn the Flyer on 2 = Auto start – start automatically when you take off
|
|
| 16 | R-MT | ...move by this number of metres... (default 2) | |
| 17 | R-T1 | ...in this number of seconds (default 4). | |
| UNIT | 1 | ALTI | How would you like your digital readouts of height to show? 0 = metres, 1 = feet. The way in which the logger records heights is independent of this setting, but this setting will determine how logger heights are shown when reviewing recorded flights. |
| 2 | TEMP | How would you like your temperature readout to show? 0 = degrees Celsius, 1 = degrees Fahrenheit | |
| 3 | IAS | If you have an airspeed probe, how would you like your airspeed readout to show? 0 = km/h, 1 = mph |
At different times you will want to measure your height relative to different reference points (see Should I use QNE, QNH or QFE for flying?). With its three altimeters the Flyer lets you set a different reference pressure on each of the three altimeters which you can then switch between easily.
You can set the reference pressure directly using PRSn for the altimeter you want to set. This is useful when you know the QNH for where you are. However if you want to set a reference pressure to get a certain height, the finest adjustment on pressure is 1mb which means a jump of about 30' at sea level, and the maths for working out, "What reference pressure should I use so that it shows a height of 700' where I am now?" is tiresome. So the Flyer provides an alternative way of setting the reference pressure by entering the height you want as ALTn, and then when you exit the Menu it sets the reference pressure for that altimeter to give the height you want.
When you change PRSn or ALTn, the reference pressure for that altimeter is set at the moment where you exit the Menu back to the normal flying display. If you enter the Menu and set both ALTn and PRSn before exiting the Menu, the directly-entered pressure (PRSn) will take precedence over the instruction for calculating the pressure based on the height you want (ALTn), so PRSn will be implemented and ALTn will be ignored. So it makes sense to only set PRSn or ALTn before exiting the Menu.
(Thank you to 'WarLord' on the Digifly support forum for his help on how PRSn and ALTn work).
In ALTI mode, before you go into any sub-menu, press and hold down Volume button to reset pressure and height offsets on all three altimeters. All three altimeters will now be set to reference 1013.2mb pressure, with no height offset, i.e. showing height QNE (also known as FL height).
The UK importers state that, "If you seriously adjust the kbar you will probably mess up the alti's." You have been warned. However you can always put your KBAR back to zero at any time and you are back to where you started.
Most of the time (i.e. when you just want the unit to make happy noises when going up and sad noises when going down), calibration isn't really required. However, if you find that despite setting the correct QNH your Flyer is still not showing the correct height AMSL and that is a problem for you, then calibration is the answer.
I found that my unit needed calibration to get the heights right, and several other users have reported similar findings. Perhaps the Flyer leaves the factory uncalibrated. Mine needed a KBAR offset of -34 (i.e. decrease by 3.4 mb) to come good, and no adverse effects ensued.
If you have access to a really accurate barometer, you could adjust the KBAR to get the right raw pressure readout on the Flyer. The raw pressure readout is one of the items shown on the bottom line of the digital display in normal flying mode. Remember the rule of thumb for calibration: the reference instrument should be at least ten times more accurate than the instrument to be calibrated. A suitable barometer might be a mercury column in a weather office.
A more realistic approach to calibration for those of us without access to a mercury column is as follows:
| < home | disclaimer and copyright | next > |