Digifly Flyer
Logger
The Flyer has a logger that records the following basic details about your flights:
- Max height reached (according to altimeter A1)
- Min height reached (according to altimeter A1)
- Max instantaneous rate of climb during the flight
- Max instantaneous rate of descent during the flight
- Total climb during the flight
It also assigns a sequential log number to each flight, and records the date and time on which each flight started.
Some varios log your height every minute or so, so that you can download the log details later on and use the data to plot nice charts on your computer etc. The Flyer is not one of those (you bought it because it was the cheapest, remember?); all it records is the five basic details listed above.
The Flyer has sufficient memory to record up to 100 flights. After 100 flights, it deletes all your flights except for the first and the last (strange but true). So as you approach 90+ flights in the logger, download or copy out any valuable info before it gets wiped
Starting the Logger
To start the logger, click on the Menu button  , which will take you into REC mode on the menu, and then click on the Enter button
  to start the logger. The unit emits a long beep, displays 'STAR' momentarily, starts recording and takes you back to the normal view mode for the instrument.
On Flyers with software v7.1 or later, the unit can be configured to start recording automatically. With the default settings, the unit interprets any vertical movement of more than 2 metres (up or down) in 4 seconds as meaning that you have started flying. I find this a very useful feature because in that "By 'eck - I'm flying!" moment of takeoff, starting the logger is not in the forefront of my mind. Using the AUTR setting in the Menu you can choose whether the logger is set to start manually when you click on the Enter button in the REC menu (manual start), or to start as soon as you turn the Flyer on (always start), or start automatically when you take off (auto start). You can also change the auto-start trigger values R-MT and R-T1, although in practice I find the defaults are about right.
If your Flyer has version 6.9 software or earlier, you don't have the auto-start feature. The software can be upgraded – the easiest way to do this is to send it to the UK importers and ask them to do it (see links page).
The display stopwatch (CHRONO) starts again from zero at the time that the logger starts.
A REC symbol  flashes in the lower left corner of the display when the logger is recording.
Stopping the Logger
To stop the logger, click on the Menu button . With the logger running this does not take you to the Menu as it would do ordinarily – instead it flashes the word 'STOP' in the digital display on the lower right corner of the display. Hit the Enter button to then stop the logger.
(If you hit the Menu button but then do not hit the Enter button, then after 7 seconds the flashing 'STOP' word goes away, the display reverts to normal recording view and the logger continues uninterrupted)
When the logger stops, the unit emits a long low tone.
Reviewing the logged flights
To review the log of your 100 most recent flights:
- Make sure that the logger is not recording – you cannot review the log while recording (see Stopping the Logger, above)
- Click on the Menu button to enter the Menu mode
- Use the Display-Up
 or Display-Down
  buttons to get the the 'PEAK' main menu item
- Click on the Enter button to go into the PEAK sub-menu
- The unit is now displaying the details of your most recent flight
See below for how to interpret the display.
Once you are in 'PEAK' mode, you can switch between viewing the maximum and minimum values for the recorded flight.
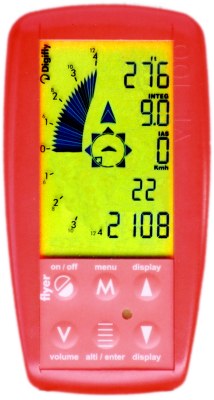
To switch between viewing the maximum values and viewing the minimum values, click the Enter button . Maximum mode is indicated by all the 'up' segments being on, and minimum mode is indicated by all the 'down' segments being on. In the screen-shot above all the 'up' segments are on, which means we are viewing the maximum values for the flight.
When in maximum mode:
- In the analogue part of the display (the left side of the screen), all the 'ups' show, to indicate that you are viewing the maximum values for this log entry.
- The top line of the digital display is dual function. It can show either the max height you got to during this flight – in this mode the little 'm' or 'ft' above this line is steady. Or you can change it to showing the total climb during this flight – in this mode the little 'm' or 'ft' above this line flashes. To switch between max-height mode and total-climb mode, click the On/Off button
 (the On/Off button can't be used to turn the unit off while in log-view mode).
- In maximum height mode, the little 'm' or 'ft' is steady, and the top line shows the maximum height you got do during your flight as recorded by altimeter A1. If you are working in metric, then what you see is what you get (800 shown would mean 800 metres max altitude). If you are working in feet then what you see is the maximum recorded value divided by 10 (i.e. with a zero knocked off the end). So in the case shown above we are working in feet (the little 'ft' is showing above the top line) and the value shown is 276, so my maximum height attained during this flight according to altimeter A1 was 2760 feet.
- In total climb mode, the little 'm' or 'ft' flashes, and the top line shows the total climb done during this flight. This is best illustrated by example: Imagine I launched from the top of the hill which is at 1000', and then climb to 1200' (200' climb), then sink to 1100' (sink is disregarded for this calculation), then climb up to 1250' (150' climb), then sink to 1050', then climb again to 1150' (100' climb) and then sink back down to top-land back at 1000'. My max height was 1250' (the highest that I got to), and my total climb was 450' (200' + 150' + 100').
- The second line of the display shows my maximum instantaneous rate of ascent. If working in metric units, this is straightforward enough – a max 4-up shown is a max 4-up during your flight. But if working in feet, you need to remember the Flyer gotcha – the digital display shows twice the value on the analogue display (because the digital display shows fpm/100, while the analogue display shows fpm/200), so a value of 9.0 here means max 900fpm, which is four-and-a-half-up. My Flyer is set for feet, not metres, so in the example shown above, my max rate of climb during my flight was 4.5-up.
- The third line of the display shows the max airspeed during the flight, for people who have a speed probe. For people like me who don't have a speed probe, it shows a sullen zero.
- The fourth line of the display shows the sequential log number of the flight. First flight is #1, second flight is #2, etc. In the example shown above, we are viewing the record for flight #22.
- The fifth line of the display (bottom line) is multi-function. By pressing the V button
 you can get it to cycle through showing the following details:
- The date on which this flight started (this is the default item shown when you first enter the log view from the menu). The date is shown in DDMM format. So in the example given above, this flight took place on the 21st of August (hooray for dates being given the European way, and not the US way – 0312 is the 3rd of December, not March 12th).
- Time at which the flight started (24hr). While showing this, the word 'TIME' is shown above this line of the display. (Note that a bug in v6.9 of the software can mean that the minute recorded is always 14 instead of the correct value. This is corrected with later software releases. See the specification and upgrades page for details of how to get the latest software version.)
- Duration of the flight (or more probably, time from auto-start at takeoff until that time after landing when you thought, 'Ooops, my logger is still running'). This always shows in hours and minutes. While showing this, the word 'CHRONO' is shown above this line of the display.
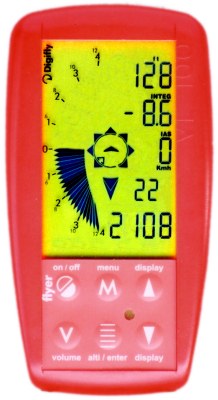
A typical display showing the minimum values looks like this:
When in minimum mode:
- In the analogue part of the display (the left side of the screen), all the 'downs' are shown, to indicate that you are viewing the minimum values for this log entry.
- The top line of the digital display is dual function. In minimum mode, it shows either the minimum height for that flight, or the total height climb (yes, this second function is same as in maximum mode). To switch between min-height mode and total-climb mode, click the On/Off button (the On/Off button can't be used to turn the unit off while in log-view mode).
- In minimum height mode, the little 'm' or 'ft' is steady, and the top line shows the minimum height you got do during your flight as recorded by altimeter A1. Same multiplier or not at in max height mode (i.e shows meters, or feet / 10). In the example shown above, my min height recorded on altimeter A1 was 1280 feet. Your min height will normally be at your takeoff point, unless you land-out below the hill.
- In total climb mode, the little 'm' or 'ft' flashes, and the top line shows the total climb done during this flight. Yes, this is the same value as is shown when in maximum mode (see earlier). There is no record of total sink, because a) this is too depressing, and b) assuming that you came back to earth your total sink is the same as your total climb (OK, not if you landed-out, wise guy).
- The second line of the display shows my maximum instantaneous rate of descent. Remember the Flyer gotcha: if working in metric units, a 4 here means max descent was 4-down, but if in imperial mode (showing feet, not meters), a 4 here means max of 2 down. My Flyer is set for feet, not metres, so in the example shown above, my max rate of descent during my flight was 4.3-down.
- The third line of the display shows the minimum airspeed during the flight, for people who have a speed probe. I haven't got an air speed probe, but even if I did, the value here would probably still be zero, since that would be my minimum air speed at touchdown in still air.
- The fourth line of the display still shows the sequential log number of the flight, as it did in max mode.
- The fifth line of the display (bottom line) is still multi-function, and showing just the same info as it did in max mode.
Viewing other log entries
Use the Up-button and Down-button to scroll through your log entries for other flights.
Note that whatever view settings you have chosen (showing max or min; showing date, time or duration; showing max/min height or total climb) remain in force as you scroll through the flights.
If you hold the Up or Down button down, it scrolls through the flights rapidly.
Erasing the log
All of your recorded flights except for log entry #1 and #100 will be deleted when you do your 100th logged flight (just one of those weird Flyer things). If you want to clear the log manually, there are three ways to do it:
- When in main menu PEAK mode, hold down the 'V' button and the Down-button together until you hear a blip-blip-blip.
- Fumble about when changing the batteries so that the unit is left without power for more than 60 seconds.
- Replace the batteries in such a hurry that you put them in the wrong way around. This not only erases the log – it also breaks the vario.
Logger units
The logger records its values in a way that is independent of what units (feet or metres) you have selected at the time of the flight. It then interprets the recordings according the the units you have selected at the time that you are viewing the results. This means that you can view any recording in feet or in metres, and the Flyer does the conversion to display it accordingly, regardless of what units were selected at the time that the recording was made.